
Tags
baking, Buttercream, classics, Cookies, Desserts, egg yolk, filled cookies, Molded Cookies, Pittsburgh Cookie Table, Powdered Sugar, vanilla, Vegetarian, Wedding Cookies
This is another addition to the Pittsburgh Cookie Table series, also totally appropriate for holiday baking time :) Don’t know what a Pittsburgh Cookie Table is or want a killer snickerdoodle recipe? Click here. Some other delicious cookie recipes in the series can be found here, here, here, here and here.
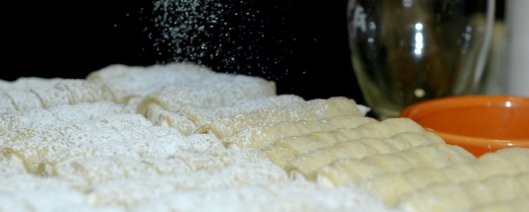
For those who don’t know – and I will say now that I am SO sorry if you are in this crowd – ladylocks are flaky pastry tubes covered in powdered sugar and filled with a creamy buttery icing. I briefly searched the internet looking for another name for them and I did not find one, only a minor conflict on whether it is ‘lady lock’ or ladylock. I think it looks better together, so that’s what I went with. And if you do happen to know if it has another name please feel free to share in the comments.
A few months ago I started buying ladylocks any time I was at a relatively decent bakery. I threw away a lot of really bad ladylocks. I ate a lot of mediocre ladylocks and a few good ones. Far too few for my liking. See, my mom used to make these by the hundreds for weddings and graduation parties, she was known for killer buttercream filling for them, so I have consumed more than my fair share of really good ladylocks. None of the ones I bought held a candle to the ones I remembered.
The ones I remembered were not crumbly puff pastry, they were a flaky light pastry tube that did NOT fall to pieces as soon as you took a bite, they held together like a good cookie should. The fillings ranged from the thick gaggy sweet powdered sugar shortening bomb to the even worse faux whipped ‘cream’ that actually contains no cream…or flavor apparently. Few had a decent buttercream, but none had the right pastry with the right filling. Little plastic containers of crushed flaky hope sprinkled with powdered disappointment. So sad.
Clearly the only solution was to get baking. So I called my mom and got her bag of round clothespins, easier than hunting from store to store to find the right ones, and hit the internet to see what They thought about the shells. Shocker – They had MANY thoughts on what makes a good ladylock shell. So I read about what a bunch of people thought about the topic them promptly tossed out most of it because the term ‘Quick Puff Pastry’ kept popping up and I’m sorry but there is no such thing. Even in their own recipes there was no such thing. Anyone who could type that with a straight face was no one I wanted to take cookie advice from. Puff pastry from scratch, even the alleged ‘quick’ method is not quick. Or easy. Mainly though it wasn’t right. Puff pastry could not create the cookie I remember; the dough is too flaky and delicate, too crumbly and susceptible to moisture, like when you were to fill it with buttercream.
So I went with my rememberings and decided to build a dough loosely based on a pie crust, that was mostly the texture and stability I wanted, but it needed to be less persnickety to work with and have a bit more structure. Knocked it out of the park with the first try then made it a few more times just to make sure because I was hesitant to believe that I nailed it off the cuff; at this point I have made these 5 times, all with the original recipe & once with all butter, all came out delicious and pretty and perfect-ish. And shockingly easy. Seriously.
I figure the easiest way to do this is to walk it through beginning to end and share the recipes and procedures as we go. As far as tools you will want around 50 old school round clothespins; you do not want the kind that have the metal thingies in them to pinch, you want to approximately 4″ long round peg-style ones. I found them at my moms after I went to Lowe’s and was told they don’t carry clothespins (really?) and that big yucky W place I can’t stand didn’t have them either. According to the internet they have them at Home Depot. You also need aluminum foil, a rolling pin, pizza cutter, non-stick spray & a cooling rack (ideally), a pastry bag to fill them is also quite handy (but a gallon baggie can be used in a pinch here, too) and a way to dust with powdered sugar – I use a small hand strainer.
Ladylock (Lady Lock) Dough makes about 52
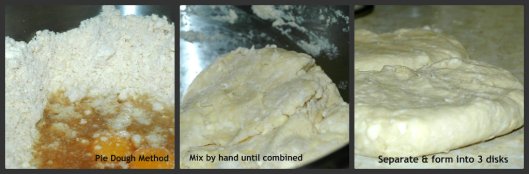
This recipe is made using the Pie Dough Method of mixing, meaning the fat is cut into the dry ingredients, the liquids ingredients are combined then the 2 are folded together using as little mixing as possible so as to develop as little gluten as possible – over developing gluten makes this style of pastry tough and dense, not light & flaky. Another factor to this is temperature. You want the fats to stay cold, so freeze the shortening a few hours before making the dough and cube both the shortening and the butter as soon as you are ready to start. This dough needs to rest & chill before rolling; I went as long as overnight and as little as 2 hours with no noticeable differences in the end pastry.
Now generally I am anti-shortening, but after trying the recipe with all butter I can say the pastry is better when it is a mixture of both butter & shortening.
- 3 1/2 cups Flour
- 8oz Butter, cold & cubed
- 10 Tbsp Shortening, cold & cubed
- 1/4 cup Sugar
- pinch Salt
- 3/4 cup Cold Water
- 2 Egg Yolks
- 1 Tbsp Vanilla
I used the food processor, pulsing half of the flour & sugar with the cold cubed butter until it was the texture of coarse meal, repeated with the other half of the dry ingredients & cold shortening then combined the 2 mixtures in a big bowl. If you dont have a food processor cut the cold, cubed fat into the dry ingredients with a pastry cutter or forks until there are no large chunks of fat & everything is incorporated.
Mix together the water, egg yolk & vanilla. Make a well in the center of the dry ingredients to pour the liquid into. Fold together with a rubber spatula until it comes together and forms a dough, about 12-15 turns. Form together to make a dough ball, divide into thirds and form each into a disk. Wrap in plastic wrap and refrigerate for at least 2 hours.
Baking Molds
I used round peg style clothespins covered in aluminum foil & sprayed with non-stick spray. The foil wrap job doesn’t need to be neat, I discovered after the first time I painstakingly wrapped some of them. It is more important to leave a piece that you can use to remove the mold easily. On this particular clothespin style the rounded top was a smidge wider so that was where we made the ‘handle’.

There are also stainless baking molds available in any number of sizes that I am sure are really very quite nice, but they are also quite expensive, especially compared to the cost of the clothespins. Being able to have so many, 50 or so, meant I could keep a pretty steady flow of these in & out of the oven making it a much faster project. I had a new tray ready to go in when one came out.
While the dough chills get your molds prepped – be that foil wrapping the clothespins or finding the molds. I bake these on parchment lined sheet trays, so get a couple of those set up, too.
Making the Ladylock Shells
I roll this dough in a 50/50 mix of flour & sugar mixed together. Get the oven turned on to 350 & have your prepped molds & pans ready.
Sprinkle your work surface liberally and start rolling. When you are done you want a piece of dough, roughly the shape of a rectangle, that can be trimmed to a rectangle that is 12″ wide and 1/8″ thick. On my first roll I get a 12″x14″ rectangle and they get bigger from there because I roll the scraps into each new disk of dough. If that seems like it might be too much dough to work with throw the scraps back in the fridge as you go, remold them into a disk when you have them all & roll out, same as the others.
Once you hit the width focus on the thickness, and thereby the length. You will be trimming off the outer edges, which tend to be thicker, but the dough should be uniformly thin, as close to 1/8″ as you can get and even.
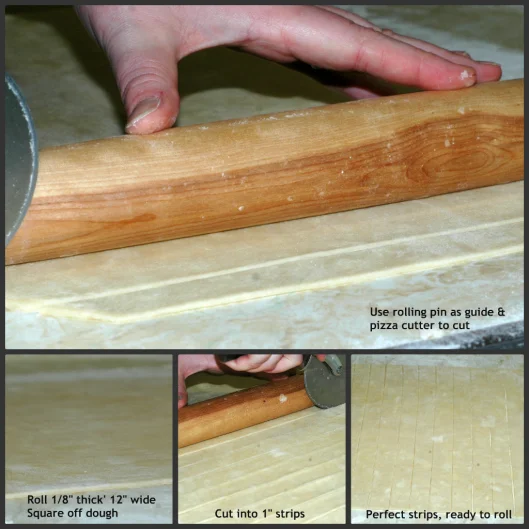 Once you have it rolled to the right shape use the pizza wheel to square up the dough to a 12″ width and get ready to cut 1″ wide strips in the dough. I use my rolling pin, like in the pics above, as a guide, running the wheel up against the pin and rolling the pin in even 1″ increments across the dough. Toss any odd end pieces in the scrap pile.
Time to wrap the dough around your molds – if you haven’t sprayed them down yet please do so now. The dough must overlap as you are rolling it on to the molds, same us you would, say, a bandage. Wrap the dough once around the bottom of the pin then spiral upward.
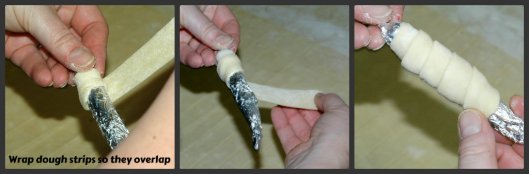 Lay the shell on a parchment lined tray. Space them evenly apart, you can fit about 15 per half sheet tray. As they get done move them into the heated oven for 20 minutes. They shells are done when the pastry looks dry and and baked through. They may take on a little bit of color, but hardly any ideally.
 With a 20 minutes bake time I had plenty of time to get the next tray(s) ready as they baked, had a nice flow into & out of the oven. When the shells are baked take them out of the oven and lest them sit for 1 minute. Literally. 1 minute. Then start unmolding them, placing the shells on a cooling rack. To unmold hold the shell delicately in your hand and gently pull the clothespins out, doing it while they are hot gives some flexibility to the dough. If you do not get them off the molds immediately you will have trouble getting them off in one piece; as the dough cools it gets crisp, crisp is not conducive to pulling out molds. It really doesn’t burn much, foil gives up heat fast. Let the shells cool completely before filling. Ahhh…the FILLING!
Buttery Buttercream to Fill Ladylocks!
There are eleventybillion different kinds of buttercream. There are Italian ones and meringue ones and French ones and American ones and and and…well you get my point. This is a riff on an American buttercream so its whipped butter with powdered sugar and some vanilla. Sounds easy…and it is…mostly. I call it a riff because it is far less sweet than a typical American decorators icing, more whipped for airy lightness and is perfect piped into these cookies. I use SALTED butter for this. If you use unsalted add a pinch while the butter whips.
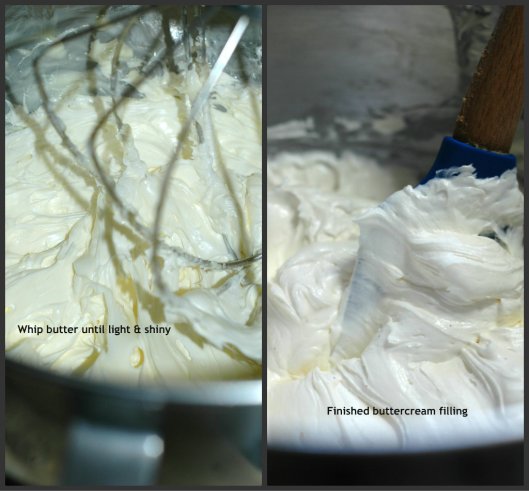
The butter for this needs to be soft, not just room temp but softer, I leave it near the stove while I am baking. I use the whisk attachment for my mixer, too, to get as much air in there as possible.
- 12oz (3 sticks) Butter, soft
- 2 cups Powdered Sugar
- 2 Tbsp Vanilla
Whip the softened butter until it light, glossy and almost white in color; this takes time, be patient. When the butter is lightened up add the powdered sugar & vanilla. Mix on low until incorporated then whip on high until light, airy & fluffy. The buttercream should be a light creamy white in color and stiffly fluffy.
 Fill a pastry bag, I fit mine with a narrow tube tip but snipping off the top of a disposable bag or gallon baggie also works fine. Fill each shell with a squeeze on each end being careful not to blop all out the ends. When they are filled lightly sprinkle with powdered sugar.
 A flaky, lightly sweet, vanilla scented crust filled with a lighter than air buttery buttercream all dusted with powdered sugar. The perfect ladylock. Out of your kitchen. Whenever you want. Or, if it suits you better, out of my kitchen ~ just email me how many you want & for when :)
Boom.
Aside(s):
- The shells freeze well – but don’t fill them before you freeze for best results.Freeze in layers with parchment in between the layers in an airtight container.
- They freeze pretty well filled, but the pastry is a little moist after thawing, as would be expected, really. Same freezing instructions- layers, parchment, airtight.

Being from Pittsburgh, I really enjoyed this and plan to try when I have time.
P.S. lady locks are also called clothes pin cookies or cream horns :)
I do believe some divine intervention (and Google kindness) led me to this post today! My daughter is getting married in October (in The Burgh, of course!) and while I and family members are making the expected spread of cookies for The Cookie Table, one has me wringing my hands – ladylocks. My mom, who was an *amazing* baker among other things, will be gone 5 years this December. Although I grew up helping her with her Christmas and Easter cookie baking marathons, and while I have definitely been blessed with her (and my dad’s) baking genes, the one thing I cannot master are ladylock shells (although I did nail her luscious version of the filling after only 1 miserable failed attempt!) Finding this post, reading your comments, and seeing your finished product have given me renewed hope that I *just might* have MY homemade ladylocks on The Cookie Table after all! Yay! :-)
I think you could be my new best friend! As a ‘Burgh baker I agree that puff pastry dough shouldn’t be used in the same sentence as homemade ladylocks. I make pretty much every other cookie table goodie but haven’t had the chance to try ladylocks yet. This is my next goal! So…with your very detailed explanation I plan to try them this fall! Thank you!
Do these need to be refrigerated after they are prepared? How far in advance can they be filled before serving? How long will they last after they are filled?
I prefer to fill them & consume within a few days, 3-4 before they get soggy. The shells freeze well, though.
I am making and freezing them for an October 4th wedding. (wish me luck!) So, ok, I freeze these and fill a few days before the wedding…..forgive me if I missed this, but Can I make the filling a few days ahead, like say, a week prior? Or, immediately before filling the shells? Also, after filled and in airtight containers, do the locks need refrigeration up to serving? Being a person from the ‘Burgh, you would think I would know these things! Tahnks for any help you can offer!
Are you sure your ingredient amounts are correct? I used 8 oz of butter (2 sticks), 10 tablespoons of shortening, 3 and 1/2 cups of flour, and 1/4 cup sugar and it is not a dry mixture at all. After adding the water, vanilla, and eggs, I now have a soup. What did I do wrong?
I think it should be 10 Tbsp shortening and 8 Tbsp (4 oz = 1 stick) butter, NOT 8 oz of butter plus the shortening. Two pie shells are 3 cups flour to 1 cup (8 oz) shortening.
Feel free to adjust how you want, I wouldn’t. The dough isn’t a pie crust so the fat to flour ratio is not the same. There is also no egg yolk or that much sugar in pie crust either.
Hey Mindy…I am attempting these but noticed 3 people thought the butter ratio was off. Please advise if it is 8tbsp (1 stick) or 8oz (2 sticks) of butter to 10Tbsp of Crisco. I delighted with finding this recipe because I have a great aversion to using all Crisco (Especially in my pie crust where I personally use half salted butter and haf Crisco rather than all Crisco). Thanks.
I use the recipe as posted w no modifications, 8 oz of butter to 10 Tbsp of Shortening. It’s a wet dough, but the recipe is accurate.
Molly- We have soup too!!! What is going on?! We added flour and sugar until we got ideal dough.
I just made these for the first time this week, and the shells came out perfect. I did use 8 TB of butter (1 stick) – mostly because I think something in my brain read oz. as tablespoons, and it worked perfectly. I used a food processor and did pulse half of the flour/sugar mixture with the butter, and the other half with the shortening (the kind with vegetable and animal fat – it makes a difference), combined them, then added the vanilla, water, egg and salt. Lots of squeezing, not much kneading so as to not toughen the dough, then separated the dough into three rectangles, roughly 4″x6″, wrapped in saran wrap and refrigerated for about 3 hours. Rolled each rectangle separately, wrapped around foiled and sprayed clothes pins and baked at 350° for 25 minutes. They came out perfectly. I am making these for my daughter’s wedding, and in order to stretch the batch, I cut my strips a little short – about 6 inches, and stretched them when wrapping them. I ended up with lady locks that are about 2.5″ in length (2 bite-size), and got 102 out of one batch! I love love love this recipe and the flavor of the cooked dough rolls. I did use a different cream filling that was my grandmother’s.
I used your recipe for my first attempt ever making mini lady locks. They turned out very good. I didn’t want to use puff pastry and all the other recipes for the dough were very time consuming by layering Crisco, rolling and folding. There were tasty.
I will be making these for my son’s wedding next October. Can you please advise me on the best time frame for freezing might be? You say best to freeze without filling, so how far ahead can I make the shells and freeze before the wedding, then should I thaw a few days before serving and fill then? Do they need to be refrigerated? Thank You!
One more question……can I make the icing ahead and if so how long does it keep?
Do you know of a bakery in the Pittsburgh area that will ship our traditional Pa. cookies? Teddi in NC
Do you use salted or unsalted butter for the buttercream filling?
I use salted for the butter cream. I think it’s necessary. If you use unsalted add a pinch of salt to it.
Having grown up in the area I know them and had been afraid to do them since so many women of my mothers age were always saying these were so hard to do. One year I tried, found my clothespins and renyolds no stick release foil…so long as the dough is right and you remove them while they are still a bit pliable you have 90% of the battle…the filling is trial and error to taste…Some add vanilla, marshamllow creme…My recipe has a hot milk component that keeps the filling smooth, creamy and glossy. I make them every year now and my do a rif or two on them in making chocolate pastry and almond cream….These are definitely part of my cookie table every christmas with about 40 others I make every year. Most in honor of grandparents gone by.
Girl! You do a cookie table every year? RESPECT!! More power to you. Your family is a lucky bunch! Have a wonderful holiday season!
Thank you! This looks like the cream filled cookie I remember as a kid in Pgh :) I have searched high and low and all I find is the flaky crust recipes, don’t want that, I want this one! I remember that it’s more like a good cookie than puff pastry. Can’t wait to have these again, thank you!
What type of butter do you use for the shell?
Truthfully I usually use salted for both the pastry and butter cream. I have used unsalted for both with no difference in the end product, I just add a little more of I think I need to.
I also had a problem with the dough. I process half the flour and butter together – great. Then i rpcoess the shortening and flour – awful. Just a thick creamed crisco. I still continued on and i have a thick, dense cookie. Disappointed. Not sure where i went wrong? The only thing i can imagine is the shortening got warm quick sitting on the counter wjile i churned the butter?
Reduce the butter to 1 stick (8 Tbsp, not 8 oz). I followed the recipe and my first result was the same as yours: a soggy, slimy mess. The next batch with 10 Tbsp shortening and 8 Tbsp butter came out perfect.
I just added more flour to the first bad batch and will use that dough for pecan tassies.
One little word of advice about flour that may be used, always use a name brand…never a store brand or one you do not know. The cheaper flours always make my cakes crappy. Name brands make them perfect.
Do you really ship Lady locks? Oh my gosh. I have been craving these for years. I am from the Canonsburg area but have been away many years…live in Colorado. I would love to have lady locks. Please let me know the price .Thank you.
For those of you who had a slimy mess with the original recipe, I did too, but I went ahead and put them in the fridge overnight to see what would happen. In the morning, the dough held together while I rolled it out, and they turned out perfectly. So don’t let that worry you. It will turn out in the end!
Wow! Great details. Exactly what I was looking for. Know what you mean about all the other recipes online. Will be making these for a special someone who grew up in Pittsburgh & these are one of his favorites – other ones are Pecan Tassie which I’ve been making for him. Just know he’ll love these. Thanks, Mindy.
I own Ladylocks by Carlene in Natrona Heights Pa. 20 miles North of Pittsburgh. They are called Ladylocks..mcream horns are the ectra large that come prepackaged in grocery stores. If you dont want to make them give me a call.
Could you make the shells a week in advance and store in an air tight container???
Hey Sharon! You can make them a few weeks in advance if you need/want to, but store them in an airtight container in the freezer unfilled. Anything more than a day or 2 at room temp and they start to get stale and in the refrigerator they start to get mushy. They take less than half an hour to thaw, and I would give them that time so you aren’t piping your gorgeous buttercream into an ice cold cookie :)
Can you tell me approximately how much the buttercream icing recipe makes? I made 17 dozen ladylocks.
And do you know how long the icing will hold up at room temp in the ladylocks after filled?
Thanks!
Hello Valerie!
The 12oz recipe above is enough buttercream to do 5-6 dozen cookies. For that many I would probably do a 2# or 2.5# batch of buttercream. The 2# would be cutting it a touch too close for my comfort.
Happy baking!
Mindy
And how many days would you say the icing holds up at room temp after ladylocks filled? This is for a wedding, so I want them to be as fresh as possible.
Ooops! Forgot to get to that part. I generally do not every refrigerate them after I have filled them, ruins the texture of the cookie and the buttercream. They can sit out for 3-4 days without any real noticeable changes in the cookie as long as it isnt humis and they are in a good container layered with parchment.
My cookies turned out so great with only a few accommodations to combat other commenters complaints about the dough being soupy.
Here are some tricks I used that might help others without drastically changing* the recipe (like by cutting the butter in half….nothankyou they’re a pastry and butter is essential to their flavor and structure, don’t reduce the amount of butter called for)…
1) portion your shortening out onto a plate or bowl and freeze for an hour before cutting with the flour/sugar. Your butter (all 2 sticks of it) should be AT LEAST as cold as your fridge and cut into tablespoon sized chunks (don’t let it sit on the counter).
2) if you’re using a food processor, PULSE the butter or shortening (whichever step youre on) into the flour until you get coarse chunks. If you over mix, it will become pasty. Don’t over mix.
3) after I pulsed the shortening into the flour, I dumped it into a bowl and put that in the freezer while I worked on pulsing the butter into the flour. Once I pulsed the butter into the flour, I added it to the bowl with shortening+flour and popped it back into the freezer while I assembled the remaining ingredients.
4) **ok here’s where I modified the recipe just slightly: I mixed 1/2 cup ICE COLD water with the yolks and vanilla, removed my flour mixture from the freezer and stirred everything together until it started to slightly look cohesive. I finished turning the dough by hand gently until it was a (slightly sticky) ball. If the dough seems dry, add up to the remaining 1/4 cup of water the recipe calls for a tablespoon at a time until you have a sticky (but not too sticky) dough ball. If you over mix, you risk a tough pastry, so only just mix until combined really.
After that I followed the recipe as directed, using 1/2″ dowel rods cut to just shorter than my baking sheets (wrapped in foil like she said) because I don’t have and couldn’t find clothespins (I’m told joann fabrics sells them but my store did not). However, if you go this route, I recommend having the dowels cut down to about 4″ (about the size of a clothespin) because trying to manage a rod full of dough was kinda challenging.
Other helpful notes: the dough needs to be really really cold before rolling. It’s a very tender and delicate dough so keeping it well chilled is vital. Also, overflour the work surface when rolling. Like way more flour than you think is necessary. The dough is so delicate that if it sticks to the counter the strips will start to fall apart when you try to roll around the pins (resulting in tasty but ugly shells).
Also, I filled with a vanilla german buttercream (Brave Tarts recipe with half the butter called for) because I like it better than a whipped American buttercream. But that’s just a matter of preference.
These were so amazing and perfectly satisfied the pregnancy craving I was having.
Thanks for sharing the recipe :)
Hi,
When you say to roll the dough in a mixture of half flour & half sugar, do you mean powdered sugar?
Thanks,
Robin
Nope, granulated sugar.
I am making these for a Fall Wedding wonder what you could add to the filling that would give it a pumpkin flavor in the filling the people what a lot of pumpkin themed cookies at the wedding was going to spice up the inside then dip the ends in some colored orange sprinkles for the theme of the wedding an suggestions Thanks Julie ?
what about a bit of pumpkin pie spice in either the dough or the cream filling. When doing fall pies I add cinnamon or spice to the pie dough to reinforce the spice I use in the filling. However if there ar egoing to be a bunch of pumpkin based cookies keep the dough original and spice the cream you get the flavor of fall without the pumpkin hit. Light and subtle. then dust with a cinnamon and confectioners sugar to finish. Very pretty!
Thanks so much for your thoughts i think i will leave the dough alone and add the spice to the filling great idea and the dusting would have never thought about using both thanks for the help Thanks again Julie :)
I grew up in Beaver County…not too far away from Pittsburgh, so I hope my comment counts! The cookies you described were always known as clothespin cookies to us. Lady Locks were always the flaky tubes. On another note, now living in North Carolina, do NOT ever call them Lady Locks unless you are prepared to receive rude looks and comments such as “Whaaaaat???” They are known as creme horns here. Thanks for posting your recipes!
I’m a beaver countian as well. My “nunny” always made these and we all called them lady locks. I loved the step by step directions and on a mission to get dowel rods or clothes pins. You are never too old to learn something new, right? I can do this!!!!
My Grandmother used to make these every Christmas for us. She was born and raised in the western Pa. area, about 35 miles west of Pittsburgh. She used to call them Lady Fingers.
We also called them “Lady Fingers” We were from Donaldson’s Crossroads about 3 miles from Canonsburg. Dietz Bakery in the Star Market(Canonsburg) had the best “Lady Fingers” I got my neighbor here in Colorado to make them according to Mindy’s recipe, they were heavenly. Nancy (Donaldson) Johnston, Montrose ,Co.
I have also found these cookie recipes under “clothespin cookies”.
Really awesome! I made them just as instructed and they are fabulous.Thanks!
Just to be clear , is the butter “real” butter or can margarine be used?
Always real butter unless another is specifically listed. :) Happy Baking!
Just wondering why you would not have used your Mom’s recipe for the dough as long as you were using her clothes pins? I’m from the South and visit my sister in Pittsburgh on a regular basis. Lady locks are a must-have whenever I’m in town.
I wondered the same thing, Allyn H,!
(P.S. I’m also a Pittsburgh girl; grew up in the Allentown / Mt. Oliver area.. My favorite part of a wedding was always the “Ladylocks”! ) I’m so looking forward to making these :)
Honestly? Because I didn’t dig the texture of her cookies. They tended to not be as layered & flaky as I wanted.
Mindy…you are a genius. I have made these twice now. I have heard that they are the best ladylocks ever eaten by multiple people on both occassions. I LOVE that you use butter…PERFECT!!!
Is the shortening Crisco or butter shortening? Growing up allot of my mom’s receipts says shortening i which she used that other buyer stuff… 🙂. I only bake with real butter.
Sorry I hate auto correct. Recipes and other butter…
I’m from Pittsburgh but have been living in Ohio for 21 years. My son is getting in October. I have never seen Lady Locks here, so I started searching and this is the first recipe I found. How appropriate!! I plan to try this recipe, in a trial run first, of course! The cookie table isn’t common here either, but I have started to see it at a few of the weddings I’ve been at lately. Their tables weren’t as big as at home, but it still made me feel good. We are definitely planning a big table!!
Our lady locks came from the Coraopolis Bakery and were not clothespin size, but larger, with more buttercream. Just heavenly. We had clothespin ones thus past weekend, both from street bakeries in the Strip District and at a wedding, and there just isn’t enough buttercream in them to be satisfying. It’s like being teased.
Thank you so much! I’m from Arnold and my mom’s friend made them for everyone. They also sold them at Princess Pastries Bakery. So many memories associated with these cookies. I’m gonna try them this week and give them out for Christmas. I can’t wait to look through the rest of the site!
We have always called these “clothespin cookies” since when people started making them, they typically wrapped them around a wooden clothespin. We have a local bakery that sells wooden dowel rod made for baking the cookies on. I’m going to attempt to make some today:)
Thank you so much for posting all this…my Mom made these alot when I was a kid too!!! Mostly for Christmas!!
Other friends and family members tried but could not get them to turn out the same. We figured out that it may have been because she used Fluffo which they no longer produce. I am going to try your Mom’s recipe this year!!! Thank You!!!
Growing up south of the ‘burgh , I have grown to love this treats. We have since moved and many years later ,we still have not been able to reproduce the cookie. My mother had lost her recipe and we have been experimenting every year trying to get a good replica. We have had many failures.Mostly the cookie literally melting away to nothing on the pin in the oven. Turning down the heat did not work , merely made them chewey. This will be my first go at these cookies and hope to have a working recipe for when my mother returns at the end of the year :) Thank you Mindy for your time on the recipe.
I made these lady lock shells this week, and while they are an easy to make version, they don’t quite work.
For those who are having trouble with the dough being “soupy,” you must treat this version like pie crust – the fat should be very cold, and the dough must be refrigerated.
Unfortunately, they do taste like a sweeter pie dough, which is not the right texture or flavor for ladylocks. I think what these are missing is yeast.
I do love that these do not call for margarine – I adapted the 80’s tribune review recipe for butter instead – and I agree, the shortening must stay in!
Will definitely try the filling; it sounds wonderful.
Try using high fat shortening ….crisco changed their formula. ..get it a a cake decorating store……mine never fail
I do not agree with this recipe, completely. I have been making these ladylocks for over 50 years, and you made a few faux pas. I will post my recipe soon.
The shell texture is different (not flakey) but I will give up on flakey to have good taste rather than a mouth of tastelss flakes. This is by far better than any other ladylock I have ever eaten or made. Thanks Mindy for the great recipe!
Would respectfully disagree, I make these often & ship all over the place, and though they may not be like yours or the recipe you use,they are damn good and have no faux pas. There are many versions of the pastry for these cookies. This is the one I adore and the one I make. Hundreds of ways to skin a cat. This is how I skin mine.
Would love to order these. Do you ship to Long Island, NY
I LOVE these here in the South they are called Cream Horns. I’ve been eating them since i was a little girl :)
I wanted to make LadyLocks for Christmas this year and came across this recipe. I’ve baked for many years but this was my first try at these particular cookies. I followed the recipe exactly and my cookies came out wonderfully! I used frozen butter and Crisco, ice cold water etc., mixed only as much as absolutely necessary. I was worried about how wet the dough seemed, but after chilling overnight I was amazed at how easy it was to roll out. Cutting even width and straight strips makes a huge difference on getting pretty, uniform cookies. And the buttercream . . . heavenly! Many steps, but all so well explained and the result well worth the effort. This recipe will be a permanent addition to my holiday cookie table. Thank you so much for sharing!
Pingback: 25 Days of Cookies, day 21 | sewingupstream
Ok so I made the dough as I was going to a cookie baking party last night. Got stuck at work and didnt make it to the party. Now I’m going out of town today for 10 days. Can I freeze dough disks? Or roll out then freeze? Or did I just waste my time and money? Thank you for your quick reply.
Should hold for 3 or so days wrapped & refrigerated. I’ve never tried to freeze them before, but in my experience with this style of pastry dough it doesn’t the well, the dough gets too wet even w a refrigerated thaw. But I’d try it, better than throwing it away without attempting. If you do I’d be curious to hear how it works.
I have made these for years as has my family…. We have often rolled them, baked them, and then froze the filled Pastries. They freeze very well and thaw without issue. We sprinkle Powdered sugar after they thaw. Freeze in an airtight container and thaw on the counter top at room temp.
I made these tonight, my first ever attempt. I don’t understand the “soup” comments..This worked out perfectly fine to me. I chilled every ingredient, froze the shortening, and used a food processor. I was actually afraid it was dry at first but it wasn’t!
Delicious
I see your site is outranked by many competitors in google.
You should spy their backlinks and use them for your website and you will hit top 1 very
fast. There is useful tool for this, just search google for ; rilkim’s
tips
i normally do the pastry tht you coat in crisco 3 times and so on but i thought id try this one. my dough looks just like pics on this site!! go me!! lets see how it rolls out and bakes..
I have an original Pittsburgh recipe from my great Aunt who did all our church baking. The dough calls for yeast and needs to chill for a minimum of 3 hours. The cream filling is made with a flour/milk roux. It is an absolute family heirloom recipe. I always make these for Christmas and weddings upon request.
These are absolutely amazing and fairly easy to make. Everyone always told me how difficult they were so I was hesitant to make my own. I made a single batch with my 17 year old son earlier today and we have the dough chilling to make a double batch after dinner!
In Ohio, we have always referred to them as Clothespins. Given they were originally made on old wooden Clothespins (100 years before my time.. Haha) Most of my old neighborhood in eastern Ohio looks at me puzzled when I use the term ladylocks…. They have never heard of them referred to as such…. Now, as I live in Western Pa…. The opposite is true… Ppl here have no idea what a clothespin is…. Haha
Goodbye Pepperidge Farm puffed pastry!
I’ve always had trouble with the filling melting, not with your recipe. I will try your recipe today! I miss getting ladylocks at stores, they don’t sell those here in Albuquerque! 😮 I want to tell you also that when I do make the ladylocks and I’m done, I always put my clothes pins in a ziploc and freeze them til I make more! 😀
Thank you for this recipe. Your well-detailed instructions helped me achieve success on my first try! I bought the cookie forms and am glad I did. I did not break a single cookie during the whole process. One box of 20 forms didn’t seem like enough but turned out to be plenty. I made about 10 at a time and by the time and by the time I had the next 10 ready, the cookies in the oven were done baking.
Pingback: Are You Serving #Cookies or #Dookies? Click to not break your guests’ hearts. | World (and Lunar) Domination
I just made these for Christmas as a trial run for my May wedding, took them home to Pittsburgh and I got tons of complements! My Aunt is the queen of cookies and she said they were the best ladylocks she ever had!! I had no trouble with the dough. They were very easy to make and were sooo delicious! I did have to double the recipe for the filling cause I may have overfilled some!
The old fashioned name for ladylocks is …clothespin cookies.
My mother-in law called these clothes pin cookies. She made dozens of them for our wedding. The filling was tinted to match the bridesmaids dresses! She lived in Youngstown Ohio and was Polish.
How long of a shelf do the Lady Locks have?
I mean shelf life do they have
Hi blogger, i must say you have very interesting posts here.
Your page can go viral. You need initial traffic only. How
to get it? Search for; Mertiso’s tips go viral
Thank you for sharing and cracking the code!!! We moved to Tampa from Pittsburgh three years ago. Ladylocks have been a staple of every holiday and wedding in my family. (Well, 99.9% of most Pittsburghers too). Minus the snow, last year I ventured to bring the holiday traditions to our new home and share as gifts for our fabulous neighbors. This recipe has knocked it out of PNC Park! I baked ~70 shells two days ago to freeze (because filled ladylocks get consumed within seconds in my home), only filling three for tasting purposes!!! Well, my neighbors heard that I started baking for the holidays. Currently, I have four people in line to be “taste testers” and are planning their diets around these cylinders of deliciousness!!! Thanks again for providing your secret of a little piece of “home”!!
My mom makes them very similar to this! … meaning no puff pastry. I googled non-puff pastry ladylocks and your article came up. I’ve moved from PA to Virginia and no one here knew what they were, but turns out they call them cream horns. So there is your other name for them. My mom also uses dowel rods wrapped in foil. Best cookies ever!
Thanks so much! This is my second Christmas using this recipe and I’m a golden God to my family. My wife’s Pittsburgh family won’t even look me in the eye as I’ve dethroned them all.
Wow, a lot of controversy over clothespins! I just had to comment because although everyone has the right to comment, I found “MJ’s” statement about faux pas and she’ll post HER recipe…….well frankly, rude. MJ, if you want your recipe out there, create your own pin, this one belongs to Mindy…….and I definitely will be trying your recipe Mindy. I love these darn things. I’m originally from Uniontown……have been in Ohio for many, many years, but I can tell you one thing – no one does a wedding like Western Pa., Especially back in the day……..polka bands, church ladies made all the great food and the festivities went on for days, changing venue from hall to an aunt’s house!
Hello Mindy,
I had a quick question. I made the shells today (turned out great, nice recipe) and I was wondering if they will keep unfilled in airtight plastic container and filled a couple days for Christmas or should I just freeze them? Thanks!
I would freeze unfilled and fill when you need them. The icing makes them go stale faster.
Just made the shells and will fill them Saturday. I liked making the dough in the food processor. Rolling the dough in half and half sugar and flour, though, makes a very sweet pastry.
These are perfection! I made them last Christmas and everyone was crazy for them! I am so thankful for this recipe and your work in putting it together! Thank you!
I was just looking through the comments, I use your recipe EVERY Christmas! They ALWAYS turn out great! And I am no baker! I saw the posts about “soup” and wondered what they could have done. I bet they used 3 or 4 cups of water intead of 3/4. I have made enough mistakes and that is something I might have done. Just my thoughts. Merry Christmas!
I’m not completely sold on the buttercream filling. Sometimes when we are young our taste buds develop an affinity for what they become accustomed to. I agree that the shell of the lady lock may need adjusted, however the finest pastries of this sort are always filled with a lighter than air, super velvety marshmallow creme. Try that filling and save the buttercream for cupcakes!!
Avid home baker, Sandie
I have noticed you don’t monetize your page, don’t waste your traffic, you can earn additional cash every
month because you’ve got high quality content. If you want to know how to make
extra $$$, search for: Ercannou’s essential tools best adsense alternative
Thank you girl this blog.
I have had he same experience with fake lady licks made of puff pasty! It’s terrible not at all what I remember
I also had a pleasant experience with the dough. I’m amazed how way igbis to work with, i do have a couple of differences however my filling is more like a cooked icing which starts with thickened flour and milk. I also am lucky enough to have my grandmothers forms made of very seasoned dowel rods my grandfather cut and whittled into a cone shape. No foil needed. By the way another name that these go by is clothespin cookies
I made the lady lock dough a few days ago, but I wasn’t able to finish the parties yet. How long would i be able to keep the dough in the fridge? I thought the fridge would be best, but I’m open to placing the dough in the freezer. I would like to bake these asap, but that is on theory with my work schedule. Thanks for the help!!
It’ll keep, well wrapped, for 3 or 4 days. The dough will start to discolor when it’s dead. I’ve honestly never frozen the raw dough, so I have no idea what will happen, though in theory it’ll be fine.
@Mindy Heisler, thanks for getting back to me. I ended up placing the dough in the freezer, and hope it keeps until Saturday. I will provide feedback on the freeze method when I know more. :)
Is the shortening you use (Crisco) the no transfat or highratio shortening?
These were so good! I followed the recipe exactly and had no problems. Also chilled the dough overnight. Very important to have the shortening chilled in the freezer and very cold butter. I cut the recipe in half and still made 36 cookies. I used 3 inch dowel rods covered with foil. This Pittsburgh girl is very happy she found this recipe.
I’ve made this recipe as-written two times now and these have turned out fantastic. I grew up with my grandma’s and aunt’s ladylocks in Western PA…Christmas, weddings, etc. I don’t have their recipes so I’m not sure if they were buttercream or cooked icings.
When I travel home for the holidays with batches of these in tow, they are met with rave reviews! Just like what everyone loved about grandma’s. This is my go-to recipe now.
And, introducing these to people in Central PA that have no idea what a Western PA ladylock is has them asking “where have these amazing things been all my life?!”
can you reuse the foil on the clothes pins for the next batch? do you have to re spray them
I just wipe them off and store them in a bag. I sprayed them the first couple times, but they don’t really need it after that.
Hello. I’m having a tea for about 18 women on Sunday, May 19. Are you still selling your Ladylocks for shipping to Cleveland, Ohio area? I’m running out of time to make them, and I thought I would go right to the source! If you can help me out, that would be great. Maybe 3 dozen, or whatever amount you sell them in. Thanks!
I made these clothespins today….I was skeptical because of the “soup” comments, but I did not have that problem….the only thing was my dough was not smooth like yours….they taste good though. When your rolling the dough, can you see bits of butter in it….I could see a lot of bits of butter in mine…I think I could have brought the dough together better when making that initial ball of dough but I was afraid to overwork it…also maybe I didn’t pulse enough…do you have any suggestions for the dough to come out smooth?…I will definitely make them again
Thanks
I had that same problem. Did anyone ever respond as to why that might be happening?
This is an old post. Are you still making lady locks for weddings? If not, I’m going to use your recipe and attempt them myself.
Hi. I too grew up in Western PA and moved 4 hrs away to the other side of the state 25 yrs ago. They’ve never heard of Lady Locks here, and Gobs are called Whoopie pies!!
My question is, what causes some of the shells to split open when baking? Same dough, same technique. . .Im not sure of the cause and this is my first try. Any troubleshooting information would be greatly appreciated! Thank you!
The main cause for splitting is wrapping the dough too tight.
For anyone who reads all the way to the bottom, I just bought 100 round clothes pins for about $10 on amazon and had them within a couple of days. I do between 15 and 30 different Christmas cookies each year, and thought I would give these a try this year. I have never done them before. I will follow the recipe exactly since, as someone else here said, it’s pastry and lots of butter is the key. Thank you for taking the time to put this together, Mindy, and also thank you for not “monitizing” your blog, as some here mentioned. It’s lovely to be able to read a recipe without all of the annoying ads. I realize that it is the way some bloggers make their money, but it sure is distracting and annoying! :-)
Thank you so much for all the details! I’ve never made ladylocks but now I think I can. Off in search of old timey clothes pins!
I know a lady who calls them clothes pin cookies
Lady locks are also known as Lady Fingers or Clothespins.
I accidently put in 2 whole eggs instead of 2 egg yolks. I am thinking it will turn out like piecrust. Should I start over?
I have made ladylocks for years, on aluminum foil covered Dow rods, with great success until the trans fat disappeared from shortening. I resorted to puff pastry for several years even though I never really liked them. I came across your recipe on Facebook cookie table. Made it exactly as written and it turned out great. However my problem is almost half of them looked great until I turned them over and found holes in them. They looked like the ones I attempted when using non trans fat Crisco. Do you know what could be the problem? I don’t think it could have been wrapping them too tight. I do press the rods down a bit after rolling them and placing them on the cookie sheet to seal the “tail”. Could this be the problem? I love the recipe otherwise and hope I can resolve this issue. Thanks.
In Europe they are called cream horns.
I don’t even like sweets but this filling is amazing! Thanks for sharing!
Being from Pittsburgh and now living in Colorado, I was missing the cookie table. They just don’t know how to do a wedding here. Been using your recipe for quite a while and friends just flip over them. I can’t make enough.